Sunday, November 1, 2015

New Babe! Leatherleaf Sedge Red Rooster

This post is loooonnnng overdue.  Frankly, I have many posts yet to be typed that are lonnng overdue.  The summer went by in a whirl and I've been caught up in so many things.  But I'm hoping this winter to dial my obligations back a bit so I can get back to enjoying my hobbies and getting into positive habits.

Anyway, back to the point of this blog.  I picked up this perennial at the Plant and See nursery in Winterville, NC back around Labor Day weekend.  Its pot conveniently fit in this nearby white basket, so I naturally had to combo the two.  I was drawn to this grass-like perennial because I don't have anything like it yet and I thought it would lend itself quite nicely to some upcoming fall decor.

Perched on the bakers rack in my foyer.

Cute "rustic" square basket-like container.

Hanging onto the care instructions for this one!

I'll have to take a photo of the autumn decorations on the bakers rack - I think this leatherleaf sedge complements the whole look perfectly.

Sunday, October 11, 2015

Perishables

There comes a time in a house plant's life when it simply just must... well, die!  This money tree had a rough start and I thought I had nurtured it well enough, but I wonder if the soil it came in was too terrible for it to make much of a go.  I had it from about end of February to end of September.

It started with 5 trunks, down to 1!

I thought this one trunk might make it through.

But sure enough it yellowed and rotted just like the others.

I had received this orchid when it was in bloom probably close to 2 years ago.  I was never able to get it to bloom myself, and in fact it never had any tremendous growth.  The leaves slowly withered more and more and finally the new growth it DID have was so insubstantial I decided to just toss it.

On the plus side, I've freed up some cool pots and am clearing out some room for new babes!


Splitting Up

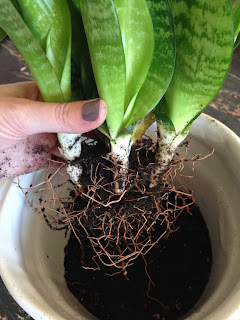
With the start of Halloween season, I had to relocate some of my babes because of the decorations that obstructed their sunlight.  In doing so, I noticed my larger snake plant had quite a few pups started.  I decided to take the opportunity to split them off and pot them in their own individual containers.

Snake plant ready for splits.

All the pups lined up in a row.

Shook off the loose dirt and separated the pups.

Tiny pot for this pup.

More room to grow for this pup.

Keeping the window sill symmetrical.
I took the opportunity to throw some fresh soil in the original snake plant's mix.  I used a cactus/succulent mix, which has some sand and a little perlite.  I used some of the old soil in the pups' containers.  I read somewhere that all fresh soil can shock new plants, so I gave them a good mix of old and new.

Saturday, September 19, 2015

Latest Arrangements

As I am repotting my babes this year, I'm trying to consolidate their displays... that is, I'm being more selective about pots I acquire and attempting to compose arrangements.

One of my favorite pots was this yardsale find, currently housing my Chinese evergreen.  Since this plant doesn't need tremendous amounts of bright light, I have it on my buffet in the center of the room, approximately 10' from the nearest window, but surrounded by 6 windows on 3 sides.

Love this plant and love this pot.

The next arrangement I'm looking at is on my over-the-couch shelf.  Previously, I only had fake flowers on this shelf (pictured in the white vase on the left half).  Since I have a couple spider plants doing well, I put them in stainless or chrome pots and set them on this shelf.  We'll see how they do away from windows.

A muted color scheme for this wall.

My plant shelf wall, next to some east and north windows, is being freed up.  I used to stack tons and tons of plant in front of this, in an attempt to hide the pipes and to capitalize on the morning sun in this corner of the room.  Instead, I've remove all but one side table, which now hosts a minimally loaded plant stand.  I'd like to use all the same pot size on that stand, but for now my begonia is going to continue to live on the bottom shelf on the left.  Also, I'm not sure where to put the black pot with my succulent grouping, since it's wide and shallow, it doesn't quite work on any shelves.

An extra side chair now breaks up the previously plant-packed corner.

On the other side of my buffet, I have an arrangement of some small house plants and some floor sized plants.  It's nice to group them together sometimes and have them feed off of each other's microclimate.

The braided umbrella tree is officially large enough to sit on the floor, fronted by a dragon tree.


A better shot of a small grouping on my new buffet table.

Thursday, September 17, 2015

New Babe! Rattlesnake Plant (Calathea lancifolia)

I didn't want to wait to post this, since I love posting about New Babes, but I cannot for the life of me remember what this one was called.  I don't know the common name for it - usually knowing that helps me find the scientific name.  Anyway, I got this from the Plant and See Nursery in Winterville, NC when I was down visiting my sister.  As I recall, it likes a good watering and some bright light (how generic, don't all plants?).

Close up of the dark spotted leaves. 
I placed some mosaic tiles in the base of the pot for drainage.
The nursery's sleeve fit right into my decorative pot.
Looks less expansive in this photo, but maybe it's just me.

I noticed tonight when I got home that the leaves had lifted up almost completely vertical.  This remind me of the prayer plant.  Perhaps it is some distant cousin of that plant?

Wednesday, September 16, 2015

Repotting

My little thanksgiving cactus was doing terribly. I'm not sure if it was some shoddy soil or maybe it sat in some bad rain water for too long.  The main trunk started to whither and had blackened at the base. The smaller trunk still looked lush so I decided to swap out the soil and repot it in something fresh.

Also, my palm was starting to lose some shape. I didn't like that I had it in a non-draining pot so I opted to go ahead and switch that out.

Old pot without any real drainage.
Lastly, I had an aloe in a baby food jar, which it was starting to outgrow, so I swapped it out for a small self-draining pot.  I added a single layer of stones in the bottom of the pot. Hopefully this pot will last for a little while!

New pot with small layer of stones inside for the aloe.


Monday, September 7, 2015

New Babe! Button Fern (Pellaea Rotundifolia)

I picked up this cutie at the Plant and See Nursery in Winterville, NC while visiting my family.  Its tag says it should be kept in bright, indirect sunlight, so I placed it near an east-facing window on my new french maple solid wood buffet.

I love that buffet so I am dressing it up nicely with some sweet plant arrangements.  Moving forward, I'm trying to keep all my plants in plastic sleeves that can be easily switched out into new pots.  I don't like doing the whole putting stones on the bottom and then infilling with soil concept.  It makes repotting more challenging because the stones don't always separate cleanly.  Anyway, back to the fern...

The tag says to keep the soil on the dry side, but don't let the plant wilt (duh!) - repot annually.  Typical temperature range 40º-70º.  We'll see how this little rascal grows!  It was between this one and a lemon button fern.  I thought this one looked a little more unique (less fern-like) so I went with it!

Potted in a small Ikea pot.  With flash!

In its new home.  No flash!

A close up of the leaves.
I'll have to take a better glamour shot in the morning when there's some sunshine.

Sunday, August 30, 2015

Summer Blooms

Most of my outdoor perennial blooms are long since gone now, so it's probably a good time to showcase some of them here.  Also, this year I opted to try out an annual arrangement in my north flower bed.  Enjoy some visuals below:

My half barrel container in its full glory!

One of my deluxe lilies.

A surprise mammoth sunflower bloom!

There were 4 of these that came up in total.

Stargazers in the ground.

Stargazer up close.

Some alyssum and ageratum.

Another stargazer variety in my kitchen.

Saturday, July 4, 2015

Sneaky Sunflowers

In the fall of 2013 I planted hundreds of bulbs around the shed.  Most of them were eaten by a family of voles the following spring.  I tried everything to ward off those pesky voles.  I couldn't get them to stop eating my precious bulbs and seeds.  I think they finally left once all the edibles were eaten.  In other words, only my daffodils and muscari survived.  Actually, I did have about a half dozen dutch irises come up this year - much to my delightful surprise!  And it seems the voles didn't quite take to the lilies, which I am so ecstatic about, because they were the priciest of all!  But on to the namesake of this post...

After it became clear my hard work with bulb selection and placement was all in vain, I decided to try a much less expensive option for summer time blooms, albeit annuals.  I figured that sunflower seeds were small so maybe the voles wouldn't notice them.  WRONG.  Every place I had planted a seed, the next morning there was a void where the voles had burrowed and eaten the sunflower seeds... or so I thought!

To my surprise, I was going around trimming back my daffodils last month when I noticed an odd weed.  Upon closer inspection I discovered it was no weed at all, but four of my precious sunflowers coming up!  I have no idea which ones they are, I had planted a variety pack and a couple red ones and mammoths.  If I had to guess I'd say the taller one is a mammoth, but we won't know until they open!  It may be a coincidence that they are all located in this little spot, I'm not sure what I had planted there last year that shielded them from the voles.  Or maybe these came up only because they are on the south side of the shed.  Regardless, I am totally pumped about them and hope to get some plantable seeds from them for next year!

June 20th

July 4th

My First Container Garden

All of my living space is on the north half of the building, so I don't have any windows facing south.  I feel this has limited my ability to really explore an entire range of plantings.  This spring I decided to take my green thumb outside a little bit more and try a container garden.  I bought a half barrel to use as a planter and picked out some red, white and blue themed annuals.

A boxful of annuals, right from the nursery!

The barrel made its debut on my stoop April 17th.  There were a couple freezing nights for which the nursery put out freeze warnings, but my little barrel made it through!

The half barrel on its first morning with a flower load!

I was pretty good at watering it every day, but once it started to establish I found myself watering it less regularly.  We got a decent amount of rain in June, so I counted that as part of my watering.

I received these yellow begonias as a gift,
they seem to complement nicely!

Just one month after planting, the blooms are
spilling over the barrel's edge!
I think my lax watering strategy the past month has not helped maintain the blooms.  They have died back significantly and in fact the sweet potato vine has discolored to a rusty orange.  This one is supposed to be a deep purple, but it seems to get burned pretty easily, turning green then orange then crispy brown.  The white alyssum did wonderfully for at least 2 months - I could smell them every time I opened the door to go inside (oddly only entering, not when exiting).  The light blue (hard to see and I forget the name) did not bloom very long and the stems seem completely dried up by now.  I tried to go in and rub off any spent blooms, but it didn't seem to encourage new ones.  The deep purple flowers maintained a bloom most of the summer.   I'll take another photo tomorrow and amend this post so you can see.

The red blooms (again, variety is lost on me) did very well most of the spring/early summer.  Despite being just one root system, the blooms branched out across the entire barrel.  Conversely, I had 6 alyssum pods spread out around the periphery.

Sunday, June 28, 2015

Decapitation Propagation

My Moses in the Cradle was getting pretty mangy...  It kept growing taller and taller, leggier and leggier.  I wasn't sure how to slow it down, the taller it got the further apart its leaves came in as well.  I tried putting it in different light, watering it less, but no matter what, the situation continued.  It finally got so tall it just bent completely over.

Leaning up against the window jamb for support!

I remember when I first got the plant, doing some preliminary research, that it could be propagated by essentially decapitating, much like the Echeveria.  Seeing as it was no longer growing UP, I thought it an appropriate opportunity to give this a whirl.  I essentially cut it in half and ripped off a good length of leaves on the "head" to allow for rooting.  I think I even trimmed back some of the stem so it could properly fit below the soil line in its new pot.

The "head," minus unnecessary lower leaves.
Added some rooting hormone, for good measure.
Now ready for potting!
Potted head.

As for the original pot and plant, I just let it chill.

Beheaded!

Weeks later, the original pot and plant have sprouted many a new heads, and the "head" repot appears to be showing signs of new growth and rooting!

New purple heads!

The crooked stem is a result of this thing bending towards daylight,  and me spinning it to resist.

I suspect, much like the Echeveria, this will just be a vicious cycle.  I may need a more active approach in pruning this bad boy back much more regularly instead of letting it go like I did with the Echeveria (which eventually grew to be primarily stalk and pathetic little leaves).


Sunday, May 24, 2015

Baby Orchid (A Memoir)

Here are excerpts from my original "plant-tracking" journal entries:


9/19/2011
Repotted orchid into larger (8") clay pot with new soil (Hoffman's Special Orchid Mix - 52% pine bark, 40% Fir Bark, 8% Special Charcoal).

Here it is repotted in the Hoffman's Special Orchid Mix with 8" pot.


12/19/2011
Moved orchid to south-facing room with windows (my brother's old room).  It was advised by my coworker (who gave me the plant) that the leaves were too dark of green, thus it needed more light.  When I thought about it, compared to the new mature orchid's leaves, that is an accurate assessment.  (The mature orchid's leaves are lighter.)  I occasionally water baby orchid with a diluted Jack's Classic 30-10-10 fertilizer.


3/15/2012
My coworker advised that I clip the bloom spike to a vertical/plumb dowel, to redirect the spike.  (The spike started to grow around Thanksgiving, and was growing in the forward direction, same as the leaves).  At first, clipping the spike seemed to work, but soon the spike began to shrivel under the clip and it has since completely withered away - as opposed to the mature orchids spikes, which, post bloom, lost color and density, but retained their size and shape.  I plan to repot baby orchid back into its smaller dish and place it vertically so it stops this awkward growth pattern.  Hopefully the spike comes again next year and I will be ready for it.

4/1/2012
Not looking too well lately - leaves are looking very shriveled.  Moved it down to living room north window sill.

9/27/2012
I think it was down to one leaf and so finally I bought some of that spongy soil and repotted it into its original little pot (actually, I repotted into its old soil and pot first and the next morning that last leaf was fully turgid and erect, so I decided to buy more of that soil).  That was probably the end of April or beginning of May.  Now the orchid has 4 leaves again and tons of roots.  It even has a root grown over an inch out of the one drainage hole.  I may repot it soon, if the roots are finding their way out of the pot, that suggests to me that it needs a bigger pot.

11/26/2012
There are presently "5" leaves on this one, the 5th seeming to be stuck at some stunted length, and 2 others being shorter than leaf #1 and what is possibly leaf #3 or #4.  I was hoping it would spike again this year, but it seems the trauma it was subject to over the past year, between a botched spike and a near-death experience through transitioned soil, has preoccupied the babe's attentions.  There's always next year!

Here it is in the foreground September 2013 before it finally died.

The baby orchid never ended up blooming for me, so I don't know what type it may have been or even what color.  I suspect a bright, deep pink, though, as the undersides of the leaves were always a deep pink color.