Thursday, September 8, 2016

Burrows Tail Babes

So I realized that I hadn't done my "new babe" post on the burrows tail succulent I got awhile ago.  It's grown quite long and I decided now might be a good time to snip some cuttings and attempt a new satellite pot! (With the hopes of handing it off to my sister one day.)


Here's a healthy tip I'm about to snip off:


Cuttings and leaf drops:


I cut the tips about 3"-4" long and rubbed off the leaves for the bottom inch. I thought about planting them right away but most articles I read online suggested I should let the cuttings air out and "callus" over.  My feeling is the cuttings would be fine and start rooting right away, seeing as many of the longer stems have roots forming just from humidity.  But for this first trial I decided to follow a pre existing convention and maybe experiment down the road.  And as I am typing this I realize I forgot to apply rooting hormones before sticking the cuttings in the soil.

Here are the cuttings and leaves in their new pot where hopefully they will sprout some roots over the next few weeks:


Sunday, August 28, 2016

Thriving Snake Plants Splits

In October of last year, I discovered that my flea market snake plant had sprouted some splits.


Bought at the Flea Market September 27, 2014
September 12, 2015

Propagations visible October 11, 2015

October 11, 2015

October 11, 2015

Two of the splits seemed slightly larger than the third and well suited for two new red pots that I had just acquired, so I prepped them some new plastic sleeves with soil and set them down in their new homes on the kitchen sink window sill, which faces west and gets plenty of direct sunlight in the evening.

Split gets a new pot October 11, 2015
Same split on August 28, 2016

Split gets a new pot October 11, 2015

Same split on August 28, 2016
The other one, I crammed into a tiny pot and placed amongst the masses in the cluster arrangement I have by the window in the dining room where it gets filtered eastern light and occasionally some evening sunlight from the windows on the other side of the living room.

Littlest split gets littlest pot October 11, 2015
Same split August 28, 2016

It would appear that the snake plant grows best with direct sunlight, as the two sitting on the kitchen window sill in direct sunlight have grown tremendously in the past 10 months.

Additionally, the other snake plant I acquired back in September 2014 is finally spreading out!  Of course, initially I had it crammed quite tightly into a narrow vase where it barely had room for soil, much less root growth or propagation.  I later repotted it into a large pot with other succulents in an experiment.  I was dissatisfied with the experiment so I split it up and set the snake plant on its own once again.  In its own private environment, it spawned a new spike almost immediately.

Just bought on September 27, 2014
Living in a vase October 19, 2014
In a cluster pot April 3, 2015

Cluster living

New propagate! August 28, 2016


Saturday, June 18, 2016

Plummeting Palm

My palm was one of the first plants I bought when I moved into my apartment.  It was so teeny tiny and I was excited for it to grow up to be a big floor plant one day.  Well, it was well on its way until one day I decided to move it upstairs to the bedroom where it got less direct sunlight and fewer waterings.
The palm in February 2015

March 2015

September 2015 - the beginning of the downward spiral.
January 2016 - just two living leaves left, coming out of the last living stalk!  One new leaf on the way, though.

May 2015 - another new leaf - on the road to recovery (I hope!)
I can't believe I neglected this thing for so long and so obliviously that 90% of it died off!  My only hope is that this last stalk will continue to recover and eventually fill out the pot once again.

Summer 2016 Container Garden

This year I decided to go with a red/pink and white theme for my half-barrel container garden.  The flower bed theme was all about purple plants!

Flowers for the flower bed.

Day 1 - semi aerial view.


New Babe! Pothos

Another flea market find was this lovely trailing pothos babe.  With the most recent round of potting and/or repotting, I've decided to incorporate landscape fabric to help keep the soil separate from the stones or whatever drainage plane medium I am using.  Previously, any time I would go to repot a plant, I'd have a bunch of stones, for example, irretrievably mixed in with soil.  Obviously you can sift them out with a screen and possibly some water, but that would take time and tools which I do not yet have.  So let's take a look at this attempted strategy for potting...
Laying s clean stone base in the ceramic pot.

My sweet new baby pothos.

I decided to switch out the stone to these chunks of mosaic tile.

The pothos in its new plastic sleeve sitting in the ceramic pot.

A closer look reveals the landscape fabric lining of the plastic sleeve.
I didn't take any photos during the cutting of the fabric, but here's the bulleted list of the process:

  1. Cut square of landscape fabric, large enough to line the entire draining pot (sometimes referred to as sleeve or plastic pot).
  2. Place fabric in draining pot, set in plant and soil to fill.
  3. Place stones or tiles or some other inorganic medium in the bottom of your non-draining decorative or ceramic pot.
  4. Place the draining pot into the decorative pot.
It's a pretty simply configuration, but over the years I've slowly been refining this process.  We'll check back in later in the year or next year to see just how effective this landscape fabric was!

New Babe! English Ivy

I'm not really sure what type of ivy this is, but as with several of my littler new babes lately, I acquired this one for about 25 cents at a flea market.  I haven't had too much luck with ivy in the past, but I'm hoping I do better with this one!

As you can see from the photo, I'm yet to even find it a suitably sized permanent home!

Sunday, February 7, 2016

Downsizing

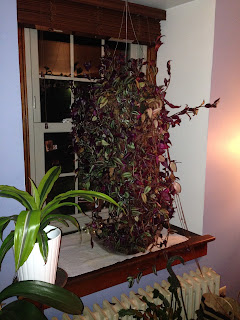
For my last pot of wandering Jew, I decided I wouldn't trim the stems and just let it keep growing as long as possible.  It grew quite long and pretty dense to the point that weekly watering was not enough to keep all the limbs nourished.  It started to dry out from the top and underside out.  Finally, at least half of it dried up and I decided to downsize it like crazy.  Observe:

Dense and long - I flipped the long ends up and over the pot.

Here it is as I start to shake out the leaves (with camera flash).

Not in terrible shape, but too dried out.

I clipped about 20 or so tips to root and repot.

I had to replenish this vase 2 times as the new roots sucked up all the water!

Ready to pot!
A new strategy I am using is to place cut-offs of leftover mosaic tile samples in the bottom of pots instead of stones.  I get the samples for free from work and they would otherwise be thrown out.  I like this better than stones, as the stone tend to mix in with the soil and it's hard to reuse them without spending a lot of time and water cleaning them.  The tiles come out and with a quick rinse (or not) are ready for reuse.